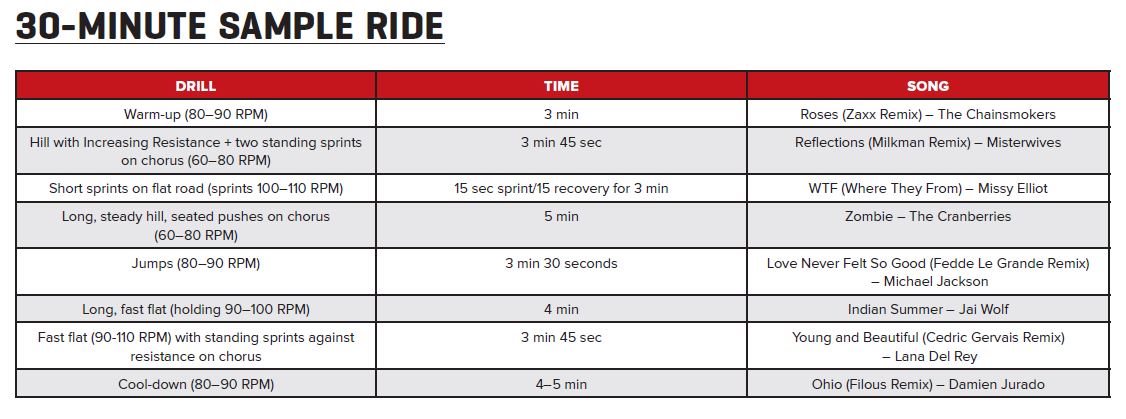
CREATE YOUR OWN CYCLING CLASS
If the number of new studios opening in Austin is any indication, indoor cycling is a trend that has people excited to get sweaty on a stationary bike. While indoor cycling may interest you, stepping into a cramped room full of strangers can be intimidating. If that doesn’t scare you, the hefty price tag of many cycling studios might. But that doesn’t have to stop you from enjoying your own heart-pumping ride. Here are a few easy steps for creating a fun and challenging indoor ride all on your own.
THE SET-UP
Take a few minutes to get set up to maximize power and ward off injuries down the road.
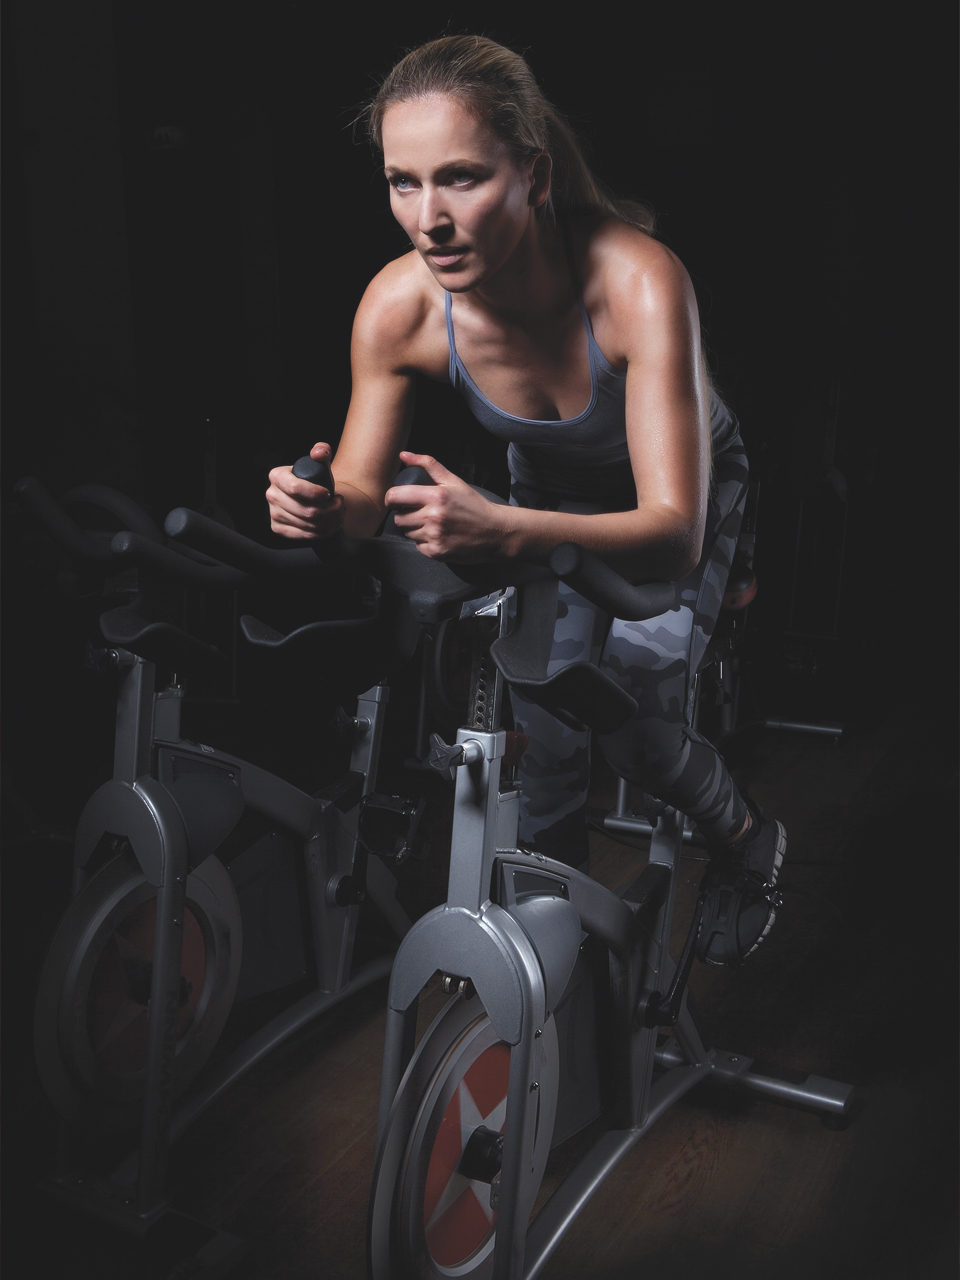
Saddle height
Stand next to the bike and bring your leg to 90 degrees. Raise the saddle to hip bone height and then hop on. At the bottom of the pedal stroke (foot at 6:00 on a clock) the knee should have a 25 degree bend. To ensure you’re not riding too low, have the saddle as high as possible without your hips rocking as you pedal.
Saddle fore/aft
Move the pedals so they are horizontally aligned (feet at 3:00 and 9:00). The knee of the front leg should be right above the ball of your front foot. Too far forward, and you put excess pressure on the knee; too far back, and you undercut power.
Handlebar height
This is about comfortability. You should be able to maintain a slight bend in the elbows and reach the handlebars without rounding your back.
Body position
Begin with a quick check: Shoulders down and back, open chest, slight bend in the elbows, loose grip, knees tracking with the toes, and ankles flexed.
THE BASICS
Speed and resistance are the core elements to consider when building your ride.
Speed
Falls between 60-110 revolutions per minute (RPM). A good “base pace” (warm-up or between intervals) is 80-90 RPM. Speed work is between 90 and 110 RPM and hill work is between 60 and 80 RPM. Don’t have a fancy bike that measures speed? Put your right hand over your right leg and count how many times they hit in 15 seconds. Multiply that number by four, and that’s your RPM.
Resistance
Increases by turning a knob or lever. Adding resistance allows you to ride hills of varying intensities. Don’t be afraid to add gear. More resistance means more force produced per pedal stroke, which means more calories burned. Hill work is also great for improving muscular strength and endurance.
A quick test for resistance: Are you bouncing on the saddle? If so, you’re using momentum (the flywheel is doing the work—not you).
Put it Together
Looking to improve aerobic capacity and muscular strength on limited time? Aim for high-intensity intervals. These can include short and steep rolling hills or quick and fast repeated sprints. High-intensity sprints/hills should be anywhere from 10-45 seconds, followed by longer recovery periods (2-3 times longer than interval).
Hoping to build an aerobic base or train for a long race? Include long, moderately intense intervals. Hill/speed intervals can be 4-15 minutes, but resistance and speed are less intense (you can hold a conversation). Since intensity is lower, recovery can be shorter than or equal to the length of the interval.
Include standing work or jumps (repeatedly standing and sitting in a controlled manner) to add variety to your ride—but avoid curls, crunches or anything else you’d never actually do on a bike. Why? You have to lower your resistance and speed—meaning you aren’t burning many calories—and you’re not lifting enough weight to create muscular strength or hypertrophy.
Let the music be your guide. What most people love about a killer cycling class is the instructor’s integration of music into the workout. Use the natural surges in songs (like the chorus) to add in standing sprints or a small burst of speed. This is an effortless way to add variety to your ride.
Finish with a couple easy minutes and a few stretches. Then walk out knowing you just crushed a cycling class created by your biggest fitness advocate—you.